Rick Hurst Web Developer in Bristol, UK

Menu

Category: mechanical

Custom dipstick on 1.9 diesel 1Y Engine fitted to a T25

T25 dipstick accessed by the numberplate hatch

After having a 1Y engine fitted to our T25, using the oddly shaped sump from the 1.6, the old dipstick (which i’m not even convinced was the right length for the 1.6) apparently only showed an oil line on the very end when filled to the max capacity of 4.5 litres. This made it really difficult to monitor the oil level as I had to constantly top it up to make the oil appear on the end of the dipstick, or risk letting it get to low. Inevitably I would overfill, which isn’t good for the engine.

A workaround I tried was to carry around in the van an old bass guitar E string to use as a secondary dipstick, which actually worked pretty well, but I wanted something to do the job properly.

I emailed T25 Direct in London to ask what they did on their 1Y conversions, and they said that they weld a spare bit of dipstick on the end of the original, put in 3.5 litres, turn it over to fill the new oil filter, mark the low oil mark with a grinder, then put in another litre and add the high oil mark.

It had been over 1000 miles since the engine was changed, so I drove down to see Phil Miller, who did the conversion earlier in the year, for a checkover, oil change and to sort out a custom dipstick.

One thing I’ve noticed is that reading the oil level really can be hit and miss on a T25 – with this conversion, the dipstick tube is bent towards the access flap, and goes slightly over vertical, which means sometimes when the dipstick is drawn out, the oil can flow slightly up the dipstick.

The fluctuation in oil level (or misreading) is quite confusing. Alarmingly, after a 100 mile run up the motorway, Rocky appeared to have used a litre(!) of oil, despite there being no smoke, and no visible leaks. I topped it up slightly to within an acceptable range on the marks we put on it, and 100 miles later it appears not to have used a drop!

Needless to say, i’m keeping an eye on it. If it was smoking a lot i’d be worried, but I think (hope!) this is just a calibration issue.

Instructions for fitting a T25 swivel seat plate from Just Kampers

Seat swivel base from Just Kampers, being fitted to a t25 camper

First a disclaimer – I am probably one of the worst amateur mechanics out there, follow my advice at your own risk! These are not official instructions, just the method I used through trial and error…

I ordered a T25 Seat swivel plate from Just Kampers, and was confused to find it came with no instructions whatsoever. I wanted to have some idea of how long the job would take, and what work would be involved so started searching the forums. I found some fairly contradictory advice, but was pleased to read that it is a fairly simple job. Basically the plate has seat runners on the top, which the seat attaches to. The bottom of the plate bolts to the top of the existing fixed runners in the van. No welding required. Here are the steps I took to fit it to the passenger side of my T25:-

  1. Remove the seat
    Slide the seat forward as far as it will go, then locate a little lever that stops the seat running all the way off the tracks – with the lever disengaged, it can be slid straight off the front – I had a bit of a fight with the glove box at this point – it might be better to remove the glove box before doing this?
  2. Sit the plate on top of the runners and locate the holes
    The lever used to lock/ unlock the swivel goes at the front. Unlock the plate and swivel it round so you can access the holes at the back. This confused me at first, I was convinced that i’d need to separate the top and bottom plate to allow access to the holes at the rear, but by rotating it to about 45% (as shown in the photo you can clear one set of the rear holes at a time.
  3. Time to get out the drill?
    The T25 only has one set of holes at the rear, but the plate has two – apparently this is because the T2, which this plate also fits, has four holes at the rear?. Some people on the forums suggested just using two rear bolts, others suggested drilling out the second hole so you can fit four rear bolts. I went with the latter, the more bolts the better. I found I needed to widen the existing rear hole slightly (in the runner, not the plate) to allow the bolt through. The rear four bolts are larger than the front – don’t widen the holes at the front of the runners
  4. Slide the provided nut + plate under the runner at the rear
    Line up the nuts (which come attached to a steel plate) with the holes, the rear bolts can then be tightened up.
  5. Slide nuts under the front of the runner, and put the front bolts in
    It looks like it is is possible to get four bolts in the front. I’m tempted to add the other two, but as the front nuts do not come attached to a plate like the rear, I think it might require improvising to get the second front nut back to where the hole is – maybe gluing a nut to a small strip of cardboard so it can be pushed under and lined up with the rear of the front holes?
  6. What to do with the under-seat compartment door?

    Seat swivel base stops the battery/ under seat compartment door from opening and closing
    Once the plate is bolted in place, it isn’t possible to open or close the battery/under-seat compartment door. You could have it permanently closed, or half open. Having it permanently closed would obscure a very handy storage compartment, so I chose to remove mine, which required drilling out a few rivets.

  7. Grease the runners, before putting the seat back on

    Seat swivel base with seat fittedThe handy thing about it being a swivel is that the plate can be rotated to a more convenient angle for putting the seat back on,so you don’t have to squeeze it in against the glove box. Remember the little lever that stops the seat flying off the front also stops it going back on again, so disengage that when the seat stops.

Bodywork almost done!

Rocky the T25 after paintwork touch up

Although this is far from a professional job, it’s a massive improvement on the brush painted grey primer, rust streaks and patches Rocky had a couple of weeks ago! There are a few more spots to do, and it could do with another coat in places. In the picture above it doesn’t look too bad – but the close up it’s a bit of a patchwork of different shades of white. Hopefully however the work i’ve done will keep the rust at bay for another year or two, at which point we might get a professional to sort it out and change the colour.

More importantly, we can now get on with the summer adventures!

Bodywork spruce-up

sorting bodywork on Rocky the T25

So Rocky has now passed his M.O.T., but after picking him up from the garage I only drove a few metres before attacking him with a drill-mounted wire brush!

When we got Rocky at the end of last summer I spent a few weekends sanding and treating rust patches before painting on some anti-rust primer, with the intention of spraying on a top-coat of enamel paint at a later date. Then winter thoroughly set in and it has been too cold and wet to do anything eversince, and I knew the rust would come back through.

Luckily i’ve now got some space in a friends warehouse for a week or two to store Rocky undercover overnight, so I can work on the bodywork and get it out of the rain/ overnight dew.

I removed the flap that covers the sliding door rail, to reveal the worst area i’ve found so far on the van, and the cause of the annoying rust streaks that appear over the rear wing. Everywhere else has turned out to be not too bad considering – a few small holes, but nothing that a bit of filler won’t sort.

The rear bottom panel is also in a bit of a sorry state, as well as being rusty I think it has been pranged at some point.

One day we’d like to get a full professional respray, including proper restoration and panel replacement where necessary. We haven’t got the budget for that right now, so i’m relying on the fact that Rocky is currently a patchwork of different shades of white to allow me to touch up areas myself with a rattle spray can.

Upgrading a VW T25 1.6 diesel CS to a 1.9 1Y engine

vw T25 with 1.9 diesel 1Y engine fitted

I’ve mentioned a few times before how I find the frugal little 1.6 CS non-turbo diesel engine that Rocky came with a bit underpowered. Before we bought the van I did a bit of research on the forums, looking at threads with people asking “is a non-turbo 1.6 diesel VW T25 it really as slow as people say it is?”. No-one challenged this assumption! Several people mentioned that they had been driving one for years and were happy with them, despite the slowness. They are also the most economical factory-fitted engine option. So on this basis that we wanted a diesel, and there were plenty of 1.6’s around we went ahead and bought one.

With the 1.6, on the flat Rocky will happily cruise along at 60mph, which is fine as it means we can keep up with the trucks. But the hills, oh my. Even on a slight motorway incline we often find ourselves having to drop down to 3rd, which puts us at about 40mph tops. Sometimes this happens mid-way through overtaking a truck, which can be particularly embarrassing. On steep A-road hills, it’s often necessary to drop down into 2nd gear, revving the life out of the engine at 25mph, worrying that either the engine, or I, will blow a gasket before we reach the top!

So a few months into owning Rocky, I started to find myself avoiding doing certain trips, or changing my route to avoid steep inclines, and coming to the conclusion that I was compromising too much, and would enjoy the van more if it had just a bit more power. As the 1.6 was starting to reach the stage where it will need some work anyway, I thought I should start looking into alternatives.

There is a wealth of information on club 80-90 and Brickwerks about alternative VW/ Audi/ Seat/ Skoda diesel engines, and doing further research, people have also fitted non-vw engines. The price and amount of bespoke work needed varies greatly – we would be looking at spending more than the van is worth if we decided to upgrade to an Audi Tdi + gearbox, which would require custom mounts and wiring loom. I’d also want to upgrade the brakes if I went down that route.

At the other end of the scale is the non-turbo 1.9 “1Y” from a mk3 vw golf or similar. This is almost identical to the 1.6 CS so is a relatively straightforward swap, reusing the sump, alternator, waterpump and exhaust and keeps the van simple (and I do love simple!), without the need to add an ECU, as you generally would with a turbo diesel. The 1Y doesn’t provide a dramatic power increase like a TD or TDi, so I canvassed opinion on the forums – is the upgrade actually worth it? Everyone who had upgraded to a 1Y said yes, it’s definitely worth it, is better on hills and in particular solves the “slowing down on motorway inclines” issue that bugs me most.

Several T25 owners have done the 1.6 CS to 1.9 1Y engine conversion themselves, but with lack of off-road workspace, tools and knowledge I thought it was too much to take on without help, so I tracked down Phil Miller on club 80-90 forum, who not only had an engine to sell, but was willing and able (as a professional mechanic by trade) to fit it at an attractive price, and give me a 3 month guarantee on the replacement engine and work.

As i’m keeping the original 4-speed gearbox, I can’t expect to increase the top-speed, or cruising speed – the engine will rev just as much as the old one. The plan is to drive it around as-is for a while and if I think there is surplus power, I can look into a higher-ratio set-up, the cheapest option being simply fitting larger diameter tyres.

While the engine was being fitted, I phoned the insurance company to get the policy amended. The company I use calculate the premium for a non-standard engine based on the vehicle the engine came from, so having established that the 1Y came from a “bog standard” Mk3 golf, the increase in the premium wasn’t too bad – I suspect the conversation may have gone differently if the engine came from a high performance car.

Today, I went to pick up the van – Phil had done a fantastic job, despite working in sub-zero temperatures in the dark some evenings to make sure my van wasn’t kept off the road for too long. He kept me informed on how the job was progressing throughout and made sure that I understood the reasons why things were done in a particular way. Phil has also done a TDi conversion oh his own T25, and, even though it is a more powerful engine, he was really pleased with the 1Y conversion on mine because it went so smoothly and the resulting engine looks like it is factory fitted, with little or no bespoke parts. In fact the the only modifications needed were to fabricate a bracket for the throttle cable, and move a small amount of insulation from the underside of the engine cover to provide clearance for the fuel pump. The only thing that needed ordering that couldn’t be taken from either engine was a spigot bearing for the gearbox input shaft.

So how did it perform? Basically exactly as I had hoped, and probably a bit better! The steep hills on A-roads that I would have needed to drop into 2nd gear, I could do in 3rd, and most places where I would previously have had to drop into 3rd I could stay in 4th. Pulling off in in 1st gear feels much better, it feels safer pulling onto the motorway and once on there I sat happily at 60mph+. On the steepest stretch of M5 (heading north approaching junction 19, where it was steep enough that there is a crawler lane) it did drop from 65 to 60mph, but was such an improvement from last time I did that stretch with the 1.6, that I had a massive grin on my face by the time we left the motorway!

Obviously only time will tell how the engine will last – it wasn’t exactly a spring chicken to start with, but has had a tidy up including new timing belt, and there’s no reason why the engine shouldn’t last for many years to come. I can’t say the same thing for the old 1.6 engine – Phil noticed a hairline crack on the cylinder around one of the injectors, and lots of end float on the crankshaft, so it was coming to the end of its useful life. Phil also confirmed my suspicion that the dipstick is too short, and therefore that I had been overfilling the oil, which might explain a few things!

Keep calm and carry some tools

essential tools

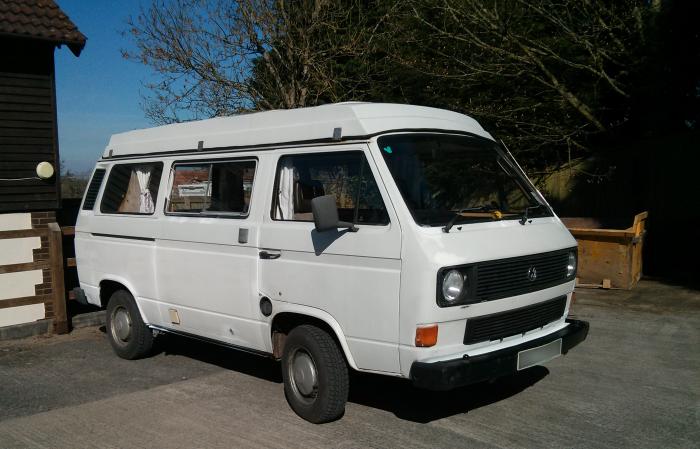
A few days before christmas we headed off on the first long trip in Rocky since buying him. The cross-country trip from our home town of Bristol to my parent’s house in Cambridgeshire is always a slog, rarely less than four hours, but with an early start to beat the traffic, we were on the M5 heading north before 7am. Despite the driving wind and rain, the van did really well. With the under-powered but frugal 1.6 diesel “CS” engine we were mostly able to keep it at a steady 60 mph, only slowing down on the inclines where there is usually a crawler lane. Future plans for the van include changing the engine for a slightly more powerful 1.9 “1Y” diesel engine (from an old golf or caddy), which won’t make it much faster, but apparently wth 29% more torque should help us keep up with the trucks on the hills.

I had been nervously excited for days about doing this trip – the van was fully loaded with food and drink for xmas, bedding for camping over new year and xmas presents, so we needed to make it to our holiday cottage in Norfolk. About a week previously we had decided to upgrade our breakdown cover to include “relay”, meaning we were guaranteed to at least be towed to our destination if it couldn’t be fixed by the roadside.

Up until now we had only done fairly short trips e.g. 60 miles and every time so far something had cropped up, notably indicators and dash light not working on one trip (on Jo’s first stint behind the wheel), and windscreen wipers suddenly stopping working. Each time something like this happens, a small amount of panic and dread creeps in – panic that you won’t make it home, and dread that sorting it out is going to lead to expensive auto-electrician bills. However, in both these cases I managed to find and fix the fault with no external help.

For the record, the indicators and dash light issue was caused by an earth wire coming loose behind the glove box – once reattached to the earth crown, the problem went away, and the windscreen wiper issue was caused by a blown fuse. The wipers share a fuse with the blower motor circuit and I already knew the blower motor was on its way out as it was squeaking badly and varied in speed, so when that seized the fuse blew. The advice found on club 80 90 is to separate the blower and wiper onto different fuses, which I will do in due course. I also need to replace the blower motor, which involves removing the dash (which in return requires removing the steering column – or at least removing the driver seat and detaching the steering column).

So on the day of our 200 mile cross-country trip, we set off early in the dark to beat the holiday traffic, and found ourselves on the motorway in driving rain and wind. Despite requiring some serious concentration to keep it in the correct lane, Rocky made it to Wisbech with no problems, other than the heating stopping for the last hour or so – probably the result of air locks in the cooling system. Triumphantly pulling onto my parents driveway I felt instantly more relaxed about the prospect of future long journeys in Rocky.

In the morning I checked the oil and topped up the coolant, reloaded all the luggage and we waved goodbye to my parents to set off on the next leg of the trip… before sitting on the driveway in quiet despair as the van wouldn’t start. Turning the key, the ignition lights came on, but nothing happened when you tried to turn it over. If the battery was flat you might expect some dimming of the ignition lights or at least the sound of the starter trying, but failing, to turn the engine, but all I could hear was a click of a relay somewhere. We tried charging the battery for a bit and jump starting it from a portable jump start pack, to no avail. There must therefore be a problem with the starter motor, or associated electrics. After fumbling around looking for loose connections but finding nothing, I swallowed my pride and called the AA.

While we were waiting for the AA to turn up (at least drinking a cup of tea in the comfort of my parents living room rather than by the side of a rainy motorway or A-road), I was feeling quite despondent. I knew there was nothing major wrong with van, but I hated the idea that as it was a couple of days before xmas, it would be virtually impossible to get hold of any parts and get them fitted in time for the start of our holiday, so might be faced with a dead van that could only be bump started (and that’s not the simplest thing in a two-tonne vehicle!). I’ve always liked to think of myself as mechanically minded, and have worked on cars myself in the past, including helping to build a Citroen 2CV from spare parts. However, in more recent years, electrical problems i’ve had on more modern cars have usually boiled down to “Computer sais no.”, followed by expensive diagnostics at a specialist garage. I wondered how I would deal with this type of problem stuck by the side of a foreign motorway. My spirits were lifted when the AA mechanic talked me through his simple diagnostic procedure and found a way to get us back on the road.

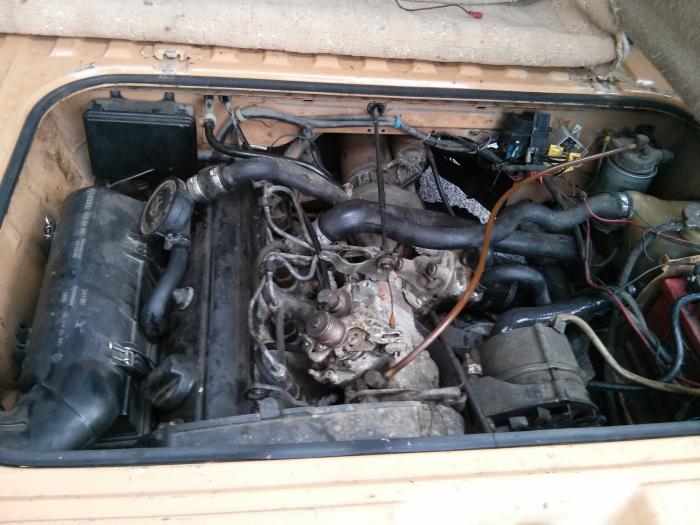
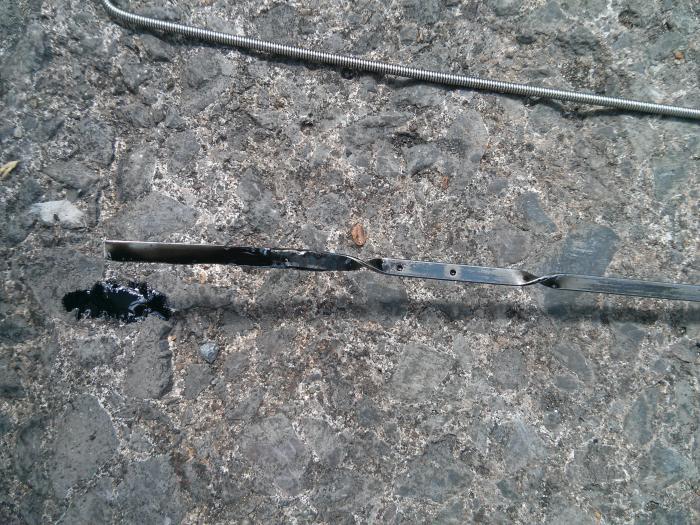
The AA mechanic attached a wire to the spade connector on the starter solenoid with a bullet connector on the other end. With the ignition switched on, this bullet connector is pressed for a second or two on the positive terminal of the battery and the engine turns over and starts. This simple, slightly inconvenient method of starting the van is how we carried on with our trip without having to resort to bump starting or finding an auto-electrician. As well as solving our immediate dilemma, this has also changed my perception of the engine – it has reminded me that Rocky has an incredibly simple engine with no ECU or immobiliser to worry about, so it should be within my capabilities to diagnose the problem and fix it myself when we are back in Bristol.

I’ve since done a bit of reading about starter solenoids, and I now understand that a solenoid is a type of relay – the 12 volt feed that I am providing via the workaround is not powering the starter motor, but causing the solenoid to complete a circuit on the thicker wires needed to handle the heavy current that the starter motor needs. This makes sense and is a bit of a relief as I initially thought that I was man-handling the much higher current needed by the starter and was surprised that the wire hadn’t melted!

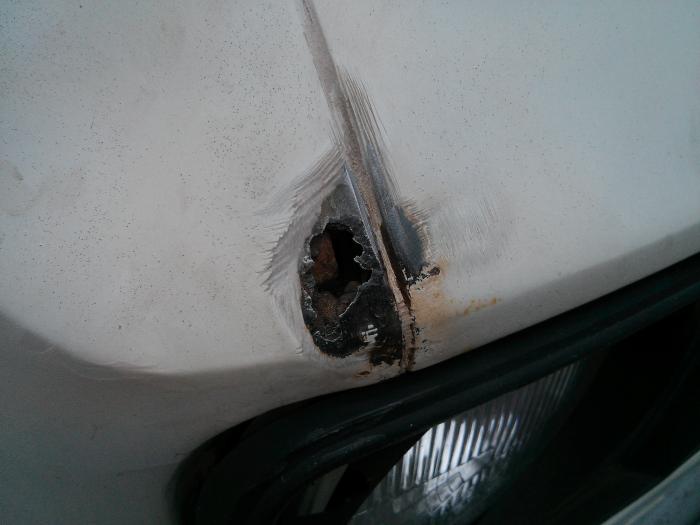
The next week or so was spent hibernating in a holiday cottage and so we didn’t use Rocky much, but when we did it involved running round the back, removing whatever was obscuring the engine bay lid, removing the lid, finding the ignition hack wire and touching the end on the battery terminal. I got a few weird looks, particularly on our last day at the cottage, starting from cold, the engine can smoke a bit for the first few minutes, until the engine gets up to temperature (I need to get the glow plugs replaced as it only fires on a couple of cylinders in the cold until it warms up, which leads to lots of unburnt fuel coming through the exhaust). Our holiday cottage neighbours (them with their two shiny black Range Rovers, us with a scruffy white campervan touched up with splodges of grey primer), were loading their luggage at the same time as us, and I needed to start the engine before we loaded everything into the back. As it idled, the wind direction and a particularly smoky start conspired to fog them back indoors until we were gone!

Our next stop was with friends/ relatives in Derbyshire where we camped for a couple of nights on their driveway with the luxury of electric hookup. This was fairly vital as I have yet to get our propex heater serviced and working, so we were relying on an electric fan heater to keep the van warm. In exchange for me sorting out their wifi network, Paul (who just happens to be a very good mechanic with a garage full of tools and random spares), diagnosed the ignition problem as being a relay, which had probably got thoroughly soaked in rainwater/roadsplash on the first leg of the trip and stopped supplying sufficient voltage to the starter solenoid. As luck would have it, he had a spare, which he fitted, and secured with a cable tie to the bulkhead with the connectors pointing downwards so any road splash will drain away rather than soak in.

Rocky got us back to Bristol again with no more issues, and no problems since. I also started putting together an electrical toolkit to carry around in Rocky, and came across some electrical spares that I used to carry around in my old T25 – including, of course, a spare relay!
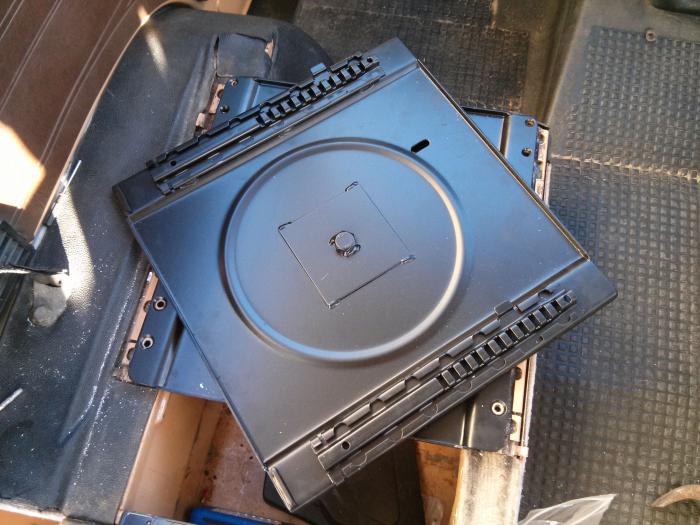