Rick Hurst Web Developer in Bristol, UK

Menu

Category: raspberry pi

Raspberry Pi WIFI bridged access point

I usually rely on a wired ethernet connection in my home office, enabled by a powerline adapter running through the mains wiring to the house, where the other end connects to one of the ethernet sockets on an Airport. Yesterday I took delivery of a shiny new Macbook Pro and was reminded that they now only have Thunderbolt 3 sockets, making my Thunderbolt to ethernet adapter redundant. Thanks a lot Apple, that’s another expensive white adapter to add to my box of random useless adapters, and another one or two to buy (I still need a USB port for a couple of things, and displayport/ HDMI for an external monitor or two).

Luckily I had a spare Raspberry Pi 3 B+ lying around, and after a couple of false starts, I now have a bridged wireless access point in the home office, bridging the wired ethernet connection from the powerline adapter. Bridged works best for me so that I still get an IP address assigned via DHCP from the Airport, in the same IP range – it just keeps things simple. I’ve given the PI access point a unique SSID rather than mirror the one used in the house because sometimes it’s useful to know which one you’re connected to.

Installing and configuring the software

This is the how-to I followed: Setting up a Raspberry Pi as a bridged wireless access point. I’m not going to repeat all the steps here, but for what it’s worth, one of my false starts was the result of this part:-

To use the 5 GHz band, you can change the operations mode from hw_mode=g to hw_mode=a.

Apparently this works for Raspberry Pi Model 3B+ onwards, but it just didn’t work for me – the access point didn’t show up. After changing it back to the default “g” it works fine. The powerline adapters (and the mains wiring they use) already limit the speed of the connection a fair amount, so i’m not too bothered about this.

The other false start was following a completely different how-to, which only resulted in locking myself out of the pi via ssh and creating an access point which didn’t provide internet access!

My current tools and tech in 2019

I try to avoid jumping on every new trend which comes along in the web world, especially over the last few years, where things seem to have moved very fast, with javascript frameworks becoming obsolete before i’ve even got round to trying them, but I also need to keep my skills and tech relevant. Here’s what i’m using as of late summer 2019.

Editor/IDE

I’ve been consistently using Sublime Text (Version 2 because I never got round to upgrading to 3) for years as my code editor, though i’ve never really taken full advantage of the extensions and customisations available. It just works and I saw no real need to change. One thing it has never done well is working over ssh, or rather from a mounted sshfs folder on a mac. I have occasional need to do this, when using the likes of nano in a terminal doesn’t feel good enough, and it’s one thing that I missed from Coda, when I used that for a while, years ago.

Then after spotting a tweet from an old colleague mentioning remote SSH editing in VS Code (via the Remote – SSH extension), I thought i’d take a look at it. Firstly, having used old-skool Microsoft Visual Studio in the past, I was surprised to see that Microsoft had built and released such a cool free editor, with builds for windows, mac and even linux. It’s already become my default editor – the intellisense and built-in terminal and git functionality is really good. There’s a lot there to explore and a ton of extensions. It also looks good.

Languages and frameworks

Most of my work is currently PHP. I no longer feel the need to apologise for that! PHP 7 is mature, stable and fast. I work on a couple of legacy PHP projects, one of which uses a combination of bespoke MVC code, an old fork of codeigniter (currently being refactored out) and Redbean ORM, and the other uses Zend framework, but is being re-built as a de-coupled app with Lumen (micro-framework by Laravel) on the back end and Vue.js on the front-end.

I haven’t done any web projects with Python recently (though i’m keen to try Pyramid), but I have been using it for a custom FTP server, using pyftpdlib (yes, FTP – for an old-skool EDI project – an old, but still very widely used technology where XML and FTP are used to exchange data – probably predating the invention of JSON and REST). I’ve also been using python for a raspberry pi datalogger project, reading serial data from microcontrollers via USB and then relaying it to a REST API.

JavaScript-wise, I still use bits and pieces of  jQuery to get stuff done while I learn Vue.js properly, which is happening as part of a current aforementioned web app rebuild. We settled on Vue.js instead of React because Vue seems to be a popular component in the Lumen/Laravel ecosystem.

For CSS, i’ve settled for now on SASS and Gulp. Sass is a keeper, i’m just using Gulp until I find something that I like better. I tend to use Susy for grid/layout.

Ansible is my go-to tool for devops – I use it to provision web servers and for formerly manual tasks such as migrations of websites, moving content between dev, live and staging on wordpress sites etc. For local development of any sort I almost always use Vagrant now, with an ansible provisioning script, which gives me a very portable set-up, provided I have enough RAM to keep multiple virtual machines running as I juggle projects.

During my last foray back into a day-job (back in 2016), working at an agency, I got a fair amount of experience using wordpress as a CMS, including for some fairly complex projects, relying heavily on the Advanced Custom Fields (ACF) plugin. Now, historically I haven’t always been a fan of WordPress, but it proved to be an excellent tool when used with ACF, making the creation of custom page types incredibly quick and easy compared to other Content Management Systems i’ve used, and even compared to using frameworks which would be my usual preference for custom content. Being able to create custom fields, included nested repeater fields via the WordPress admin, having the field definition saved to the filesystem and then versioned in GIT for seamless syncing to production is a game changer!


The Camputer Part 3 – API hacking

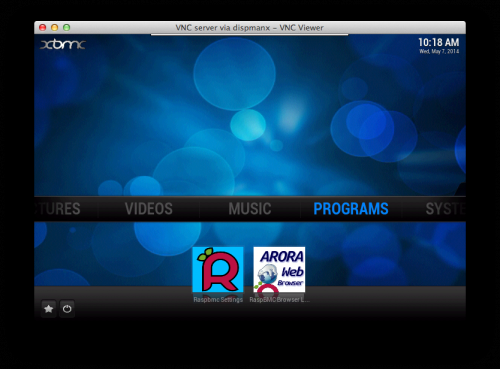
In part 2 I got RasbBMC installed, and worked out how to get vnc server running. The next goal was to get to know how the music player works, how to create playlists and most importantly hack around with the API so that I can work out how to control it from a python script.

raspbmc displaying on small lcd monitor

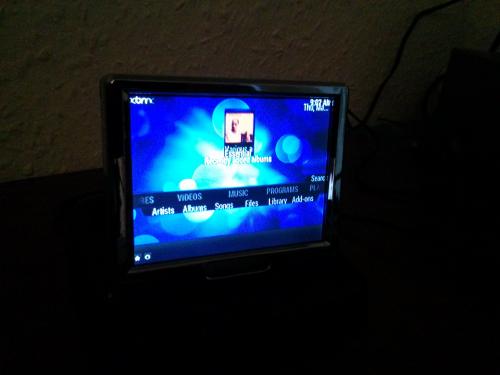
My original intention was to run the pi entirely headless, but then I remembered I had already bought a small LCD monitor for a reversing camera, that I never got round to fitting. Hooked up to a 12 volt power supply and to the PI using the RCA socket, I now have a tiny monitor, which is handy for keeping an eye on what is going on with the player.

Most of the text is illegible at that size/ resolution, so I upped all the font sizes for the default skin:-


cd .xbmc-current/xbmc-bin/share/xbmc/addons/skin.confluence/720p
sudo nano Font.xml


Now all the line-spacing is wrong, so is more legible in some places, but less so in others. I don’t want to get side-tracked right now into learning how to skin XBMC. Maybe at a later date, it might be a nice project to create (or find) something specifically for very small screens.

IInitially I couldn’t hear any Audio, so I had to change the audio settings in XBMC to use analog audio out rather than HDMI.

I spent ages reading up on the api, the documentation is pretty confusing and lacking in examples, but eventually I found some simple examples on a forum showing how to interact with the JSON-RPC API.

I was expecting to find some examples of using the python API “directly”, but couldn’t really find anything (or at least anything complete enough to understand real-world use). I eventually found this python xbmc json client.

With that library downloaded to the pi, I was able to speak to xbmc from the python prompt:-


>>> from xbmcjson import XBMC
>>> xbmc = XBMC("http://localhost:8080/jsonrpc")
>>> print xbmc.JSONRPC.Ping()
{u'jsonrpc': u'2.0', u'id': 0, u'result': u'pong'}


To open a saved playlist:-


xbmc.Player.Open([{'file':'/home/pi/.xbmc/userdata/playlists/music/test.m3u'}])


I was then able to play/pause XBMC and move to the next track from the python prompt with:-


xbmc.Player.PlayPause([0])
xbmc.Player.GoTo([0,'next'])


Before I worked out how to open a saved playlist via the API, I noticed that the above play/pause command doesn’t work if the player hasn’t been opened yet i.e. when the Pi has been rebooted. I found a way of opening a playlist and pausing at XBMC startup, by creating a file called autoexec.py in /home/pi/.xbmc/userdata with the following in it:-


import xbmc
xbmc.executebuiltin("PlayMedia(/home/pi/.xbmc/userdata/playlists/music/all.m3u)")
xbmc.executebuiltin( "XBMC.Action(Pause)" )


This is run by XBMC at startup, and doing so ensures that the player has a playlist loaded and ready to play at startup. Currently not sure where this script imports xbmc from or how I could have this available to my own application scripts and managed by XBMC, but there must be a way. Either way I seem to be able to do most of what I need with the JSON-RPC API currently, with the exception of shuffle. The following command toggles shuffle on and off:-


xbmc.Player.SetShuffle({"playerid":0, "shuffle":"toggle"})


The JSON response sais “OK”, but annoyingly it has no effect on the XBMC player. When operating XBMC manually you can open a saved playlist, and at any point click the shuffle button, to toggle shuffle on and off, and the next track will either be in order, or “random” from a shuffled list. I was hoping that this toggle on the API would have the same effect, but apparently not. I think I may have to consult the XBMC forum, once i’ve put togther a precise list of commands that i’ve tried, and checked exactly which version of XBMC and API I am using (you know how forums can be if you go asking questions without providing enough background info!).

If it turns out that this is a bug and there is no solution for shuffling the current playlist with the API, I can envisage a workaround involving dynamically creating a shuffled version of each of the saved playlists. As I intend to create some kind of playlist management app for this (outside of XBMC), it would be a simple step on from that.

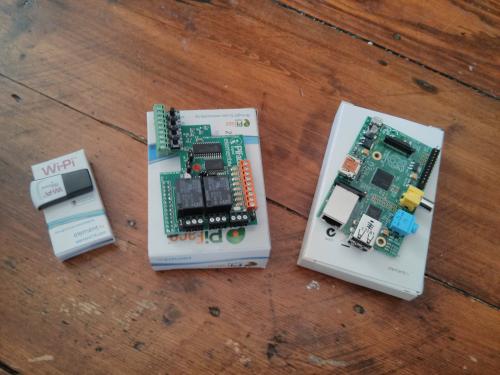
So, besides working out a solution for shuffle, the next step is to connect the Piface digital I/O expansion board, and work out how to trigger API stuff in response to button presses.

The Camputer Part 2 – raspBMC installation

(See Part 1 for details on what the project is about and the kit bought for it so far).

I decided to go with RaspBMC as the operating system, on the basis that I wanted something Raspian/debian based, and this distro is exactly that, but with the benefit of being preconfigured as an XBMC media player.

I ordered a 16gb SD card (I intend to keep my media on an external USB drive) and used the instructions to create a bootable raspBMC installation, using my macbook air, which has an SD card slot.


Then I put the SD card in the Raspberry Pi board that I got from UK Farnell, hooked up to a keyboard, mouse, ethernet cable (connected to our home router), power supply, audio cable to my hifi amp and our TV via HDMI cable.

The bootable SD then takes you through the rest of the installation – it took about 25 minutes.


The Pi then booted into XBMC, which i’ve never actually seen before, and it looks great. I enabled AirPlay in the settings and found that I could stream audio and (non-apple DRMed) movies from itunes and from my wife’s iPhone. I’ll probably set one up specifically as a home media system in the future, and probably others just for audio streaming to amps/speakers around the house.

I then went of at a tangent, trying and failing to get a vnc server installed and working, so that I can control it from another device, as it will likely be run headless in the camper van. After a bit of digging though, I realised it already has a VNC server installed which can be enabled in the system settings – the raspBMC settings rather than XBMC settings. You can also start it from the command line with:-


service vnc start


I couldn’t get it to connect using OSX screen sharing, so I installed Real VNC viewer. It seems very sluggish, but works.


So the next stage is to hook it up to a USB drive with some music on it, create some playlists and investigate how I can interact with the player programatically via the API.

Follow-up posts:

Part 3: The Camputer Part 3 – API hacking

Raspberry Pi project – the Camputer (Part 1)

raspberry Pi kit for my camper van in-vehicle computer

I’m building an in-vehicle computer for my camper van. I wasn’t sure whether to blog about this here or on my Camper van blog, but as the project will initially be about software, i’ll start here, then move over to the campervan blog when I get to the point of installing it.

Why does a campervan need an on-board computer?

Well obviously it doesn’t need a computer, but here are a few things i’d like to do with it:-

Media system

I don’t have many CD’s these days, so I currently use my phone or an ipod to provide music to the stereo system, but it is a bit of a faff, fiddling around with cables and chargers and stuff. I’m also pretty disorganised with my music collection and have several small collections spread out over different iTunes libraries etc. It’s also a pain (not to mention dangerous) to operate a touchscreen while driving. The main requirements for my ideal music system therefore are:-

  1. All my music in one library
  2. Physical buttons to play/stop and skip tracks (a bit like an iPod shuffle)

I have in mind a set of switches and buttons on the dash that I can operate by feel. Aswell as the basic functions listed above, there might be toggle switches for different playlists or genres.

The media system could have a small monitor or LCD display, but should be able to be operated using only the buttons. Other operations (such as creating playlists etc.) I would envisage a web interface, VNC or maybe plugging in a monitor and keyboard.

I haven’t decided what media player software i’ll use, but hopefully there is something with a decent api that I can hook my custom controls to.

I’m thinking mainly music, but with a ceiling mounted pull-down monitor it could also drive a (motor)home cinema system in the future,

Engine diagnostics

I have a bluetooth OBII adapter that I use with the Torque Android app. From a quick google around, people are using them with a Pi, so i’d like to set up some logging.

Security/ Tracking

It would be great to have the Pi send location updates to my server, to tie in with my travel blogging. It could also potentially be useful if the vehicle gets stolen, or I lose it in an unfamiliar town!

Remote switching of the heater

My camper has an on-board propex-heater, so the Pi could potentially be used as a thermostat or to switch the heater on from a web/ phone app.

Kit

So far I have:-

So the first phase will be to decide on an OS and media player and work out how to control it using physical switches – watch this space!

Follow-up posts:

Part 2: RaspBMC installation

Part 3: The Camputer Part 3 – API hacking